Essential Tools & Materials for Patching Drywall
Before you begin any drywall repair, having the right tools and materials on hand will save you time and frustration. Whether you’re fixing a small nail hole or a larger damaged area, these essentials will ensure a smooth, successful process.
Basic Supplies You’ll Need
Be sure to gather these supplies before starting your repair:
-
Utility knife
Great for trimming loose drywall edges or cutting into damaged areas. -
Sanding sponge or sandpaper (120 to 220 grit)
Used to smooth edges before applying compound and to level the surface after patching. -
Drywall compound (pre-mixed or powder)
The core material for filling and smoothing over damaged spots. -
Putty knife (4″–6″)
Ideal for applying an even layer of compound over the patch area. -
Drywall patch or mesh tape
Choose mesh tape for smaller cracks and holes; use a drywall patch for larger holes that need more structure. -
Paint and primer
Helps you seamlessly blend your repair with the rest of the wall. Choose a color that matches your existing paint.
Don’t Skip Safety Gear
Protecting yourself should be a top priority:
- Dust mask – Especially important if you’ll be sanding compound
- Protective eyewear – Keep dust and debris out of your eyes while cutting or sanding
Before you jump into the repair process, make sure everything above is within reach. Working with the right tools not only makes the job easier, it results in a longer-lasting, professional-looking finish.
Repairing Wall Holes by Size
Dealing with wall damage can feel overwhelming, but the solution often depends on the size of the hole. Here’s how to repair wall holes step-by-step, based on their severity:
For Small Holes (Nail or Screw)
Ideal for tiny blemishes left behind by nails, screws, or thumbtacks.
Steps:
- Fill the hole directly with spackle or drywall compound.
- Use a putty knife to smooth the surface.
- Allow the compound to dry completely.
- Sand the area until it blends with the surrounding wall.
For Medium Holes (2″–6″)
These require additional support due to the larger gap.
Steps:
- Place an adhesive mesh patch over the hole.
- Apply drywall compound over the patch using thin, even layers.
- Feather the edges outward to create a seamless blend.
- Let each layer dry fully before sanding.
- Repeat as needed for a smooth finish.
For Large Holes (6″ and Up)
Larger holes need structural support to ensure a sturdy and clean repair.
Steps:
- Cut a clean square or rectangle around the damaged area.
- Prepare a matching piece of drywall to fit the opening.
- Insert a wood backing board behind the hole and screw it in place for support.
- Attach the drywall patch using screws into the backing.
- Cover the seams with drywall tape.
- Apply compound over the area in layers, feathering each coat.
- Once dry, sand the surface until flush with the wall.
With the right approach and tools, even large drywall holes can be repaired seamlessly.
AI Is Speeding Up Workflow—Without Replacing Humans
Creators are using AI to get more done in less time—but they’re not handing over the keys just yet. Tools like ChatGPT and Descript are helping with script drafts, B-roll suggestions, title generation, and even light editing. The grunt work is getting lighter. That doesn’t mean it’s safe to zone out.
Authenticity still matters. Viewers can sense when something feels stitched together by a bot. The best vloggers in 2024 use AI to kickstart ideas, set structure, or shave hours off repetitive tasks—but their own voice drives the final product.
What’s getting automated? Transcriptions, SEO research, thumbnail A/B testing. What’s staying hands-on? Storytelling, on-camera energy, community engagement. The takeaway: AI isn’t here to replace you. It’s here to keep pace with the speed of content. Use it wisely—don’t let it flatten your style.
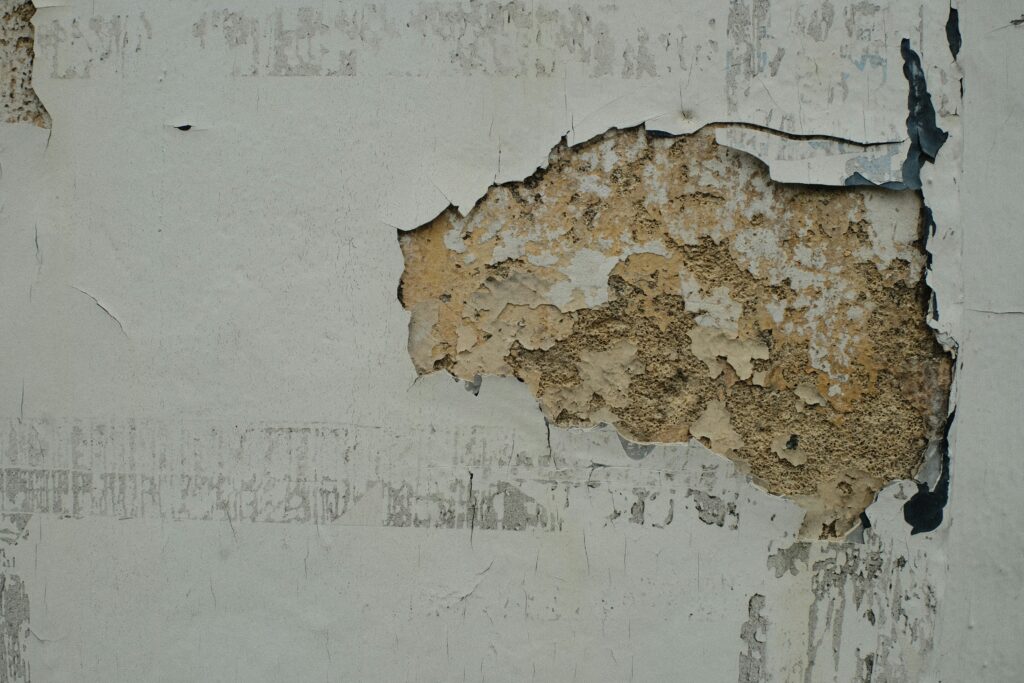
Drywall Damage Is Common—But Fixable
Small dents, popped nails, and accidental holes—drywall takes a beating. The good news? Most of it isn’t a big deal, and you can fix it without hiring a pro. For minor damage, all you really need is some spackle, a putty knife, sanding sponge, and maybe a little touch-up paint. No contractor, no inflated invoice.
Learning to patch drywall yourself saves money and time, especially when the damage is purely cosmetic. Even better, clean, finished walls leave a strong impression when it comes time to sell. Seamless patches show buyers the home has been well cared for—and that can edge up your resale value more than you think.
So next time you bump a corner too hard or hang a frame slightly off, don’t stress. Most drywall jobs are easier than they look, and with some basic tools, you’ve got everything you need to handle it.
Micro-Niching for Loyal, High-Intent Audiences
Big audiences used to rule. In 2024, tight-knit communities win. Vloggers are getting hyper-specific with topics—think “minimalist vanlife for single dads” or “eco fashion unboxings under $50.” The goal isn’t mass appeal anymore. It’s resonance.
Micro-niching brings clarity. Viewers know exactly what they’re signing up for, and that clarity builds trust. A smaller audience that genuinely cares is more valuable than a million passive subscribers. These fans comment, share, and—more importantly—buy.
Niche content also simplifies monetization. Sponsorships get more targeted. Affiliate links land better. Some creators even skip ads altogether, relying on merch drops, Patreon support, or niche brand partnerships because their viewers are invested, not just passing through.
For creators feeling burned out trying to please the algorithm or go viral, micro-niching is relief. It’s about depth, not reach—and in 2024, that’s a smart trade.
Smooth Drywall Finish: Compound Like a Pro
Getting a clean, professional drywall finish is all about technique and patience. Rushing the process or applying too much at once can lead to cracks, bubbles, or uneven texture—costly mistakes that demand rework. Here’s how to get it right the first time:
Apply Compound in Thin Layers
Less is more when it comes to joint compound:
- Thick applications take much longer to dry and are more prone to shrinking or cracking
- Thin coats build up smoothly and dry evenly
- Each layer should cover but not overwhelm the surface
Sand Between Coats for Seamless Results
To get professional-looking seams:
- Light sanding eliminates ridges or high spots
- Use a fine-grit sanding sponge or pole sander for control
- Avoid over-sanding, especially near tape edges
Let It Fully Dry Before You Sand
Patience pays off:
- Even if it feels dry on the surface, the inner compound may still be soft
- Rushing this step can damage the finish and force you to start over
- Consider humidity and temperature—both affect drying time
Light It Right for a Flawless Finish
Before calling it complete:
- Use bright, angled lighting to inspect the surface
- Shadows reveal imperfections that overhead lighting may hide
- A portable work light can help you spot flaws you’d miss otherwise
A solid drywall finish isn’t about speed—it’s about the right technique and attention to detail. Master these basics, and your results will speak for themselves.
Once your patch is dry, it’s time for final sanding. Go for ultra smooth—think flush with the wall, no ridges, no bumps. A fine-grit sanding sponge works best here. Take your time; this is what makes the difference between a visible patch job and a seamless finish.
Next up: priming. Don’t skip this. Raw joint compound or spackle can suck in paint and leave a noticeable dull spot. Use a standard wall primer and let it dry fully.
When it’s time to paint, use the same color and type of finish as the rest of the wall. Lightly feather the edges to blend. If the patch is large or you’re dealing with older, sun-faded paint, the best bet might be repainting the whole wall. It sounds like overkill, but it beats a patch that stands out for all the wrong reasons.
If you’re seeing damage near outlets, light switches, or wiring, hit the pause button. Don’t chalk it up to cosmetic wear—this could signal an underlying electrical issue. Scorch marks, a faint burning smell, or outlets that feel warm to the touch? All red flags. And flickering lights might not just be a bulb going bad—they can trace back to faulty wiring or overloaded circuits.
Before you tear into drywall or slap on a coat of paint, check your electrical setup. Ignoring this part can lead to bigger problems, fast. And unless you’ve got experience, this is when you call in a pro. Safety beats guesswork every time.
Need a primer on what to look for and when to call in reinforcements? Take a look at this guide: Understanding Electrical Issues and Simple Fixes.
Patching drywall isn’t rocket science, but it does demand a little discipline. Most mistakes come from rushing—cutting corners leads to bumpy surfaces, weak patches, and repairs that scream, “somebody panicked here.”
Start by squaring off the damaged section. No ragged edges, no crumbling bits. The cleaner the cut, the smoother the outcome. Use a scrap of drywall that matches the thickness of the original wall. Fit it snug. Not tight, not loose. Then, tape and mud like you mean it—but keep it light. Thin layers build strength and hide the repair. Slap on a thick coat and you’re sanding for an hour tomorrow.
The key? Take your time. Let things dry thoroughly. Sand between coats. And don’t skip priming before you paint. That’s how you make a repair disappear. With basic tools, a little patience, and zero shortcuts, you can make it look like the hole was never there.