Raised garden beds aren’t just trendy—they’re practical. Putting plants above ground gives you tighter control over soil quality and drainage. That means fewer worries about runoff, compaction, or poor native soil. Your plants get what they need, nothing less.
There’s also less bending and kneeling, which your back will thank you for. Raised beds help cut down on weeds too, especially if you line the bottom with barrier fabric before adding soil. Maintenance gets a little easier, and staying on top of your garden feels more like a habit and less like a chore.
For beginners or anyone working in tight spaces, raised beds are a strong starting point. They give structure, they’re easy to manage, and they can be built just about anywhere—from a postage-stamp backyard to a rooftop corner. It’s gardening made simple without dumbing it down.
Set Up Your Raised Bed Right From the Start
Start with location. Pick a spot that gets 6–8 hours of sunlight a day. Without it, most plants—especially veggies—won’t thrive. Make sure the area drains well. You don’t want standing water; soggy roots kill growth fast. Also, think practical. You’ll need to water often, so being near a tap or hose saves frustration.
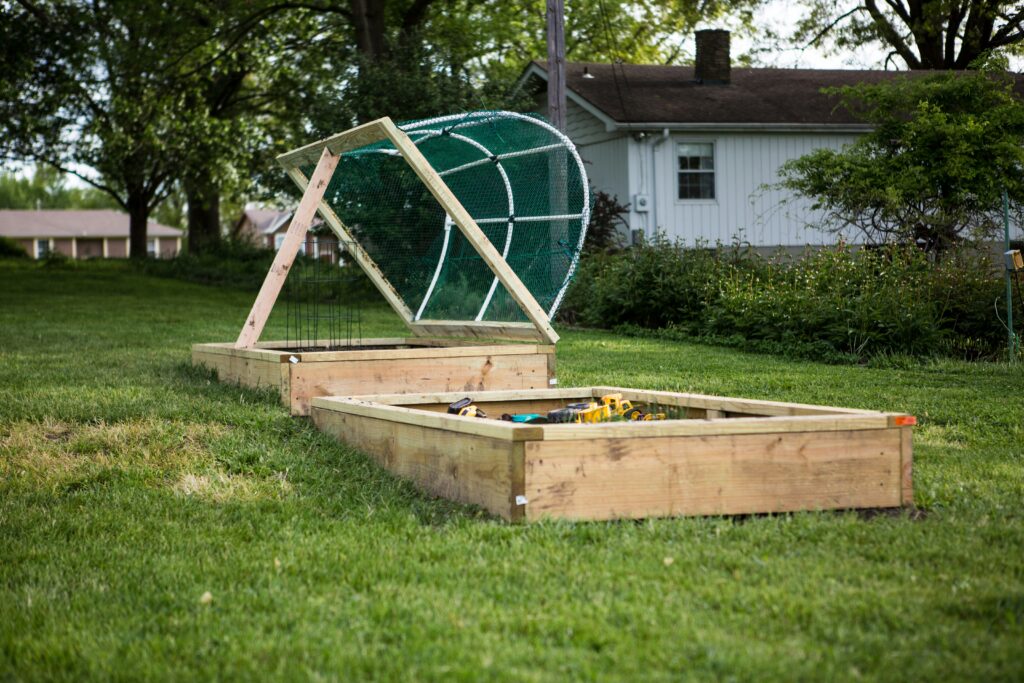
Next, get your sizing right. A 4’x8′ bed is a common choice—it’s roomy but still manageable. Go for a height between 12″ and 24″ depending on what you’re growing and if kneeling is comfortable for you. Higher beds help with drainage and make gardening easier on the knees.
Now the materials. Stick to untreated wood (like cedar or redwood) so no chemicals leach into your soil. Gather a quality soil mix—half compost, half topsoil gives a solid base. Landscape fabric underneath helps stop weeds from creeping in while keeping the structure stable.
Build it once. Build it smart. Everything you grow starts here.
When it comes to building something that lasts, your material choice matters. Cedar is a solid go-to—naturally weather-resistant, lightweight, and pretty easy to work with. It holds up well over time without needing much babying. Pine is cheaper and easy to find at any big-box store, but it’s softer, less durable, and needs sealing to survive the elements. If you’re going for a rustic look (or just want to keep it sustainable), reclaimed wood is worth considering. It adds character and reduces waste, but you’ll need to check each piece for warping, nails, or damage before using.
As for tools, the basics don’t change. You’ll need a saw (circular or miter saw will do), a drill with various bits, screws (don’t cheap out here), a good tape measure, and a level to keep things square. If you’re working solo or out in the field, a clamp and stud finder won’t hurt either. Keep it simple, but don’t skimp—bad tools make even good wood frustrating.
Step-by-Step Assembly: Measuring, Cutting, Fastening
Start with solid measurements. Double-check every piece before you cut—this saves you headaches later. Measure twice, mark clearly with a pencil, then cut using a circular saw or handsaw, depending on what you’ve got. Precision matters most for the corner joints, so take your time on those.
Once your pieces are cut, do a dry-fit. Mock up the bed frame without fasteners to make sure everything lines up. If things look off, trim or sand accordingly. When it’s go time, use exterior screws or galvanized bolts if you plan on moving the bed later. Drill pilot holes to prevent wood from splitting, then sink in your fasteners. Work corner to corner, not side to side—this helps keep everything square.
Keeping Corners Square and Level
Use a speed square or tape-measure trick (the 3-4-5 triangle method) to check that your corners are at a true 90 degrees. Once you’re square, clamp it down before fastening. A level across the top rails will catch any tilting—don’t skip this. Uneven frames cause long-term issues with drainage and soil retention.
Reinforcement for Larger Beds
If your raised bed is over six feet long or two feet high, reinforce it. Mid-span bracing with 2x2s or 2x4s helps prevent bowing from soil pressure. For height, think corner posts that run slightly taller than your boards—gives room for adjustments and extra strength at stress points. Lastly, consider an interior crossbeam if your bed’s on the bigger side. It’s a simple step that keeps your structure tight, season after season.
Before anything goes down, the prep work has to be solid. Step one: get rid of all grass or weeds in the area where you’ll be working. Don’t just trim—pull it all out, roots and all. Leftovers can punch through later and ruin a clean install.
Next, roll out a layer of landscape fabric. This isn’t just busywork—it blocks future growth and helps keep your setup low-maintenance. Overlap the seams a bit and secure the edges with staples or small rocks. It doesn’t need to be perfect, just tight enough to keep light out.
Last, check how water moves in the area. If rain or runoff tends to collect there, you’ll want to level the space or add some gravel underneath to improve drainage. Otherwise, you’re setting yourself up for puddles—and whatever you’re installing won’t last.
Build It Right: What Goes Into Ideal Raised Bed Soil
Starting with the right soil mix isn’t optional—it’s the foundation. A good raised bed blend usually comes down to three main parts: topsoil, compost, and something for aeration. Topsoil brings basic minerals and structure. Compost delivers nutrients and beneficial microbes. And aeration materials like perlite, vermiculite, or coarse sand keep things loose so roots can breathe and grow.
Out of the three, compost pulls the most weight. Good compost isn’t just rotted food scraps—it’s balanced, broken-down organic matter that actually fuels plant growth. It improves moisture retention, adds essential nutrients, and supports a healthy underground ecosystem. Store-bought will do in a pinch, but homemade compost with yard and kitchen waste is gold if done right.
Depth matters too. Leafy greens and herbs get by with 6–8 inches. Tomatoes, peppers, and other deep-rooting crops need 12 inches or more. Root veggies like carrots or parsnips? Go for 12–18 inches to avoid stunted growth. Build your bed tall enough and plan for settling—soil compresses over time.
Get the soil mix right, and everything else—watering, feeding, harvesting—gets easier. No fluff. Just better results.
Starting a small garden doesn’t have to be complicated—especially if you choose the right plants upfront. For beginners, go with forgiving growers that don’t need constant attention. Think cherry tomatoes, lettuce, radishes, green onions, and snap peas. They’re quick to sprout, flexible with space, and don’t need much babying. For herbs, try basil, mint, parsley, and thyme. These are low-maintenance, useful in the kitchen, and grow well in containers or garden beds.
When it comes to seasonal care, the rule is simple: plant to match the light and temperature. Spring is your green light. Start with greens and peas, then tomatoes and basil as things warm up. In fall, pivot to cold-hardy options like kale and garlic.
Basic maintenance is mostly about staying consistent. Here’s a loose checklist: water the soil (not the leaves), pull weeds once a week, and harvest often to encourage new growth. If you miss a few days, no crisis—just pick up where you left off.
To keep watering easy, try a drip system or soaker hose on a timer. If that’s overkill, a watering can and ten focused minutes every morning will do the trick. The key is low-fuss regularity. Get that right, and the garden mostly takes care of itself.
Build It Once, Reap for Years
Start Small, Stay Consistent
A thriving raised bed doesn’t require a massive yard or an expert green thumb. Beginning with a modest footprint allows you to learn as you grow—literally.
- Choose a manageable size (e.g., 3×6 feet) for your first bed
- Focus on a few easy-to-grow veggies like lettuce, tomatoes, or herbs
- Water and tend regularly—a little effort consistently goes a long way
Taking small, steady steps leads to bigger harvests over time.
DIY for the Win
Constructing your own raised bed is budget-friendly and empowering. With simple tools and basic materials, anyone can build a functional and attractive framework for healthy plants.
- Use affordable, untreated wood or repurposed materials
- Follow simple online guides to build safely and sturdily
- Customize your bed height or shape to suit your needs
You’ll develop new skills and gain a deeper connection to your gardening space.
More Than Just a Garden
A raised bed is more than a place to grow vegetables—it’s a long-term investment in your health, resilience, and peace of mind.
- Provides a reliable food source right in your backyard
- Encourages outdoor activity, mindfulness, and learning
- Adds beauty and purpose to your space year after year
Start once—and you’ll soon find it’s a habit and a harvest that keeps giving.
Going green in your garden isn’t just a nice idea—it’s practical. Start by sourcing materials with a smaller footprint. Look for local suppliers, reclaimed wood, biodegradable pots, or recycled metal planters. Skip the shiny stuff that’s wrapped in layers of plastic.
Next, get to know companion planting. It’s not rocket science. Some plants grow better when paired—basil near tomatoes can keep bugs off, marigolds deter nematodes. Mix that knowledge with crop rotation (don’t plant the same thing in the same place every season) and you help your soil bounce back year after year.
Then there’s mulch. Add a good layer and you’ll water less, weed less, and keep your soil happy. Use wood chips, bark, leaves—whatever you’ve got that breaks down naturally. It’s one of the simplest changes with serious impact.
Want to dig deeper? Check out our related guide: Eco-Friendly Landscaping Techniques for a Greener Yard.